Creating Tenancies
Once you have added your properties, you can start assigning tenancies to them. This guide takes you through the process.
Firstly, go to Tenant Manager > Tenancies > Create Tenancy, or simply press the green Create Tenancy button at the top of every screen.
The Create Tenancy wizard is split into six sections, though you only need to complete the first two to create a tenancy.
Main Tenancy Details
Enter the Property Reference, the Tenancy Type and the Start and End Date of the tenancy.
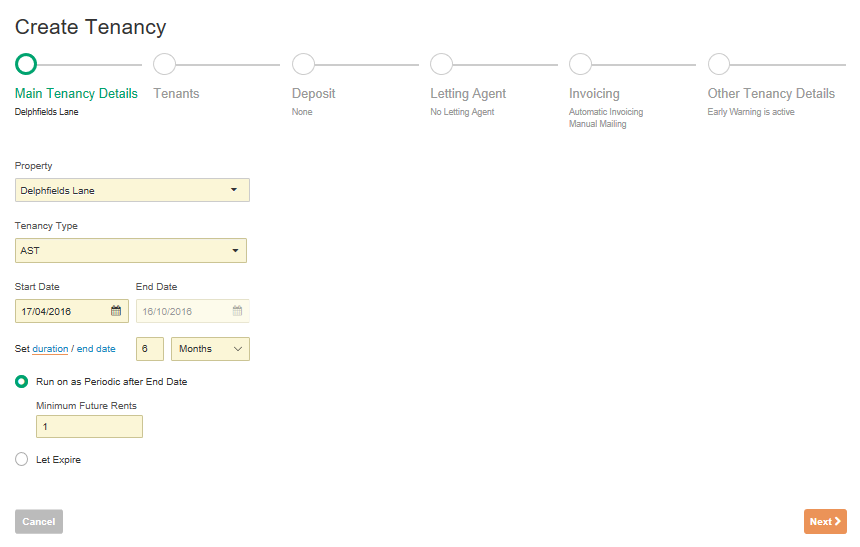
You can either enter a duration or type in the actual end date. If the tenancy is in the periodic phase, set the expiry date to be that of the tenancy agreement and the radio button at the bottom to Run on as Periodic After End Date.
The Minimum Future Rents option will determine how many rental invoices will be available at any given time at the bottom of the Payment Schedule after the latest due payment. The default option will gave you one invoice every payment term (e.g. monthly). Increase this number if your tenant often pays in advance and you need extra invoices to allocate payments to.
Use the +Add Property selection on the Property dropdown to add a new property if the one you want is not there. If you are going to assign the tenancy to an individual room, we do that on the next screen.
Once done, click Next.
Tenants
On the next screen you need to enter your tenants, assign rooms and set up the Payment Schedule of when the tenant is due to pay. If your tenancy started a number of months or years ago and you do not wish to record all of the historical payments in Landlord Vision, set the Start Date on this screen to be the date at which you want to start tracking rents from i.e. the current month or the first payment date of the tax year. Landlord Vision will ask you to enter an Adjustment at this point to cover the time from the start of the tenancy until the start date of the payments. If you do not wish to use this, simply leave the Rent field at £0.00.
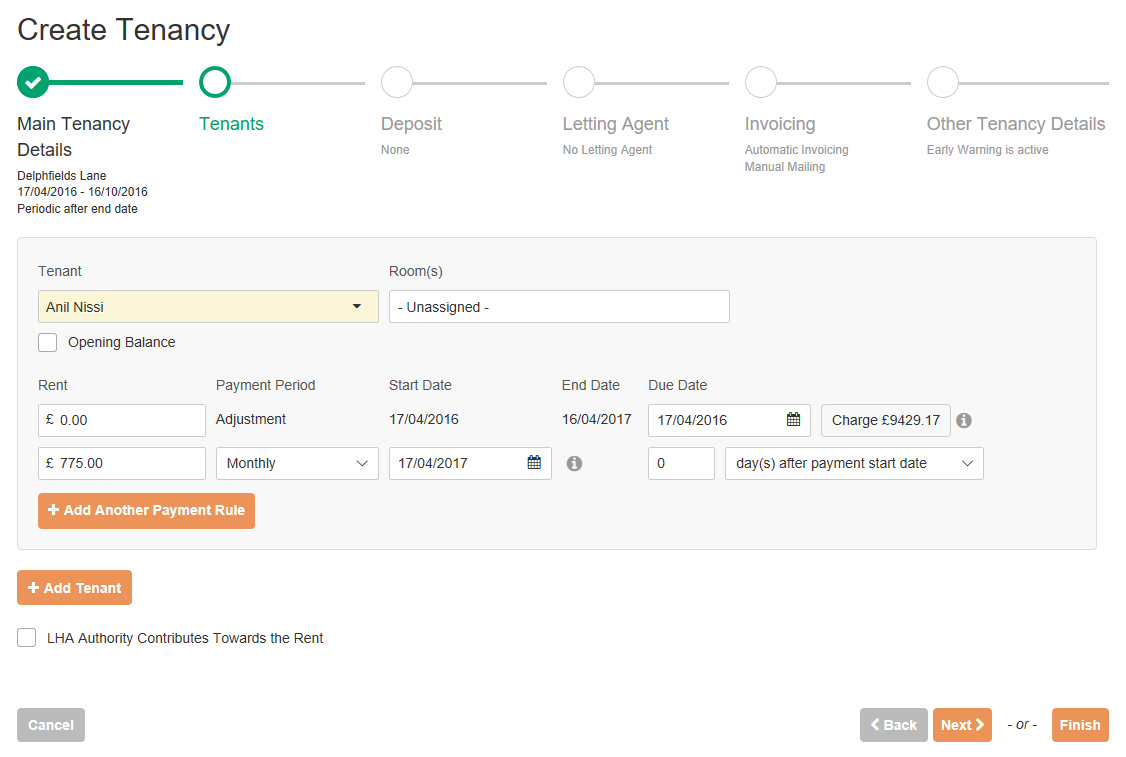
Use Opening Balance to record if a tenant is in credit / arrears at the time that you are tracking payments from.
If your tenant has not been added yet under Tenant Manager > Tenants, select +Add Contact in the Tenant dropdown box.
Record the Rent, Payment Period, Start date and End Date. If the Expiry Date falls during a payment period, then the system will create an Irregular Payment to make up the remaining days. This is calculated from the monthly rent divided by the number of days in the month, multiplied by the number of days in the irregular payment.
Eg. Rent = £775, Irregular Payment period starts in June and lasts for 16 days
(775/30) x 16 = £413.33
If there is more than one tenant living in the property, press the +Add Tenant button to record their details. You can record whether they are paying rent or not and which room they are staying in if you need to. You can record different Payment Periods for your tenants if required.
If the tenant is receiving benefits, tick the LHA Authority Contributes Towards the Rent tickbox and fill in the details.
If the tenant's payment period starts on one day but they pay on a different day (e.g. the day they get paid) then you can set the Due Date to reflect this.
* At this point you can click Finish if you want to move on to other things, and this will take you back to the Tenancy list page. If you wish to add further details about the deposit, letting agent and set up the invoices and the early warnings then click Next to view these parts of the wizard.
Deposit
On the next screen you can record the details of the deposit.
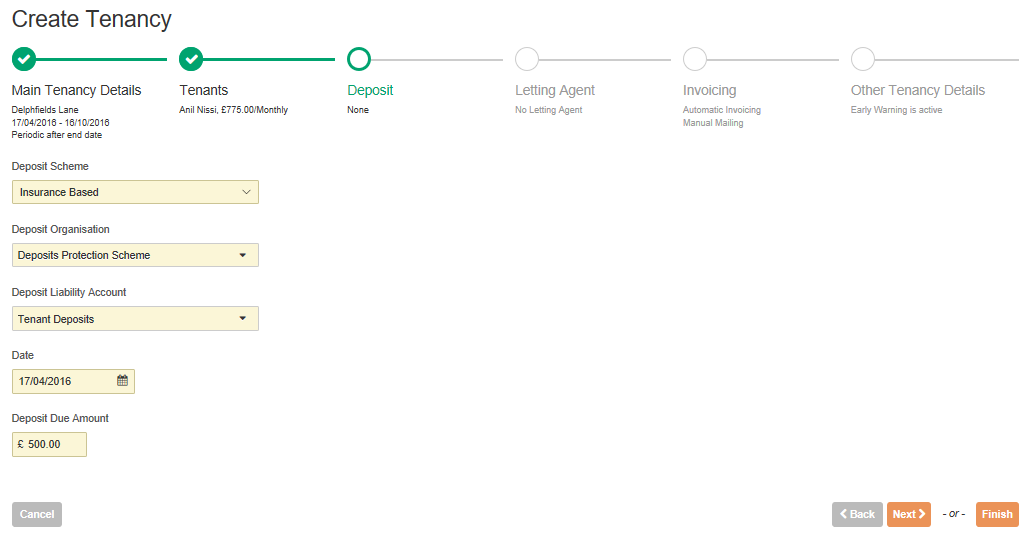
Set the type of scheme, whether it is insurance based, custodial or non-AST, and enter the organisation who is protecting the deposit (if applicable).
The Deposit Liability Account can for the most part be left as it is but can be changed if needed.
Enter the date and the amount.
When you return to the tenancy, click on the Manage Deposit button to record the payment and the details of it being protected. More information can be found in this guide.
Click Finish to return to the Tenancy list or Next to continue with the wizard.
Letting Agent
If you used an agent to find you a tenant, or your property is managed by an agent on your behalf and they take a commission off your rent, you can record that in this section.

If the agent is not already entered, select the +Add Contact option in the Letting Agent dropdown box.
Let Only means that the agent found the tenant for you and applied a fee to the first rent. To reflect this, the software will make the first invoice payable to the agent and take the fee off the payment received from the tenant before transferring the balance (if any) to the landlord. All further payments will be to the landlord.
Letting and Rent Collection means that the agent is responsible for all the rental payments and the software will make all invoices payable to the agent, taking a commission fee off every payment.
Full Management is the same as Letting and Rent Collection, except that tenant charges will also be pointed to the agent rather than the landlord.
Don't forget to set up the VAT on the agent commissions if your agent is charging it.
If your agent has different types of charges, press the + button to add additional fees.
Use this screen to determine whether you or the agent receives the deposit by toggling the radio buttons.
More information on letting agents in Landlord Vision can be found in this guide.
Click Finish to return to the Tenancy list or Next to continue with the wizard.
Invoicing
Landlord Vision uses invoices to calculate arrears and for its own internal accounting processes. More information can be found in this guide. It is therefore recommended that you leave the Automatically Create Invoices option ticked.
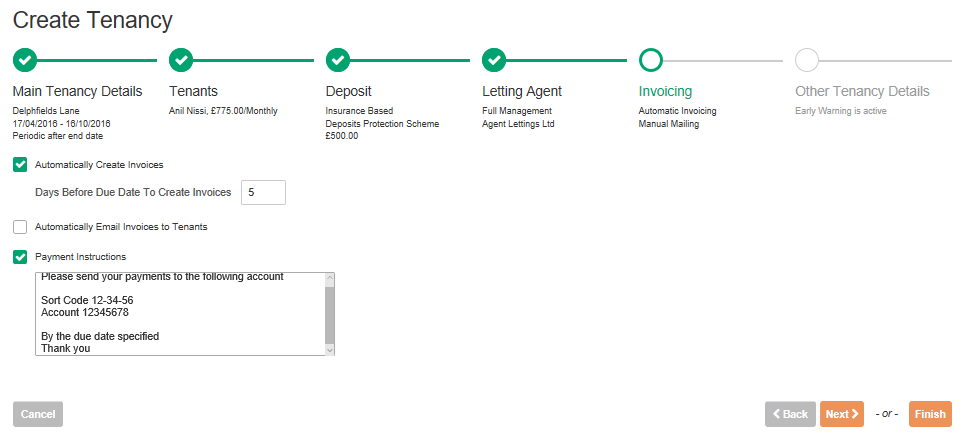
Use the Automatically Email Invoices to Tenants option to send your tenants an invoice on the day it is created. For example, you may have tenants who forget to pay or may not realise what day they are supposed to pay on. Use the Days Before Due Date To Create Invoices option to create the invoices a few days early to give your tenants time to see the invoice before they are due to pay.
Use the Payment Instructions to inform your tenants how to pay if you are sending invoices out. Also, don't forget to add a header to your invoices too. Payment instructions will appear on charge invoices assigned to the tenancy as well.
Click Finish to return to the Tenancy list or Next to continue with the wizard.
Other Tenancy Details
On this screen you can input the guarantor details, enter an addendum on the bottom of the AST for this tenancy and set up an early warning if you have an Expiry Date set. By default, Landlord Vision will notify you four weeks before a tenancy is due to expire.

Click Finish to return to the Tenancy list.
Customer support service by UserEcho
