Adding Headers to Invoices
You can create headers to go on your invoices. These can include your name, address, logo and any other information you may wish to appear. Adding a header makes your invoice into a legal document as otherwise this information isn't included.
To add a header to your documents, navigate to Settings > Document Headers > Create header.
Build up your header in the editor. Please note that the header title is for reference only and does not appear on the document itself. The logo will appear on the left hand side of the header.
Tick the box Print Headers on Documents to display your header on any invoices and press Save.
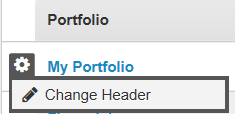
Don't forget to assign the header to whichever portfolio(s) you want to use it with. Place your cursor over the portfolio in the lower half of the Document Headers screen and look for the cog icon. Select Change Header from the menu that comes up.
Now the header will appear on the invoices in the portfolios you have selected.
Please also see this guide to sending invoices.
Customer support service by UserEcho
